This is probably my best craft project EVER. Usually I make crafts that sit on a shelf or hang on a wall and sure they are great but nothing compared to the joy this will bring my daughter and if I built it well enough maybe her kids too.
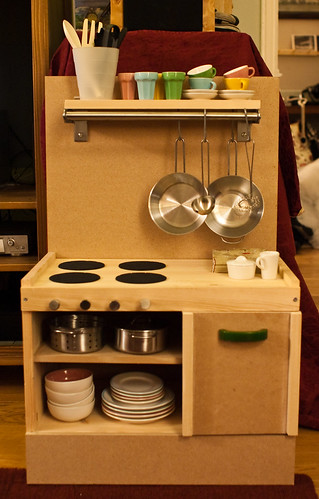
So let me just come out and say that I didn't INVENT this idea. Who knows who did....just like who knows who invented Mod Podge tile coasters?? One night I decided to google wooden play kitchens and I came across the pics below. Immediately I knew this was at the top of my to craft list. These adorable pics I found on Ohdeedoh and Flikr jumpstarted this project.
Ok lets get down to details already. I was originally going to make an all in one kitchen like the pictures above. However, I wanted Ashtyn to have a bit more space for her collection of kitchen goodies. I purchased two IKEA RAST night tables, one for the stove and oven and one for the sink, counter and storage space. The RAST is $19.99 in Canada and $14.99 in the US. If your wanting to make it more affordable then just make an all in one kitchen like the pics above.
Also keep in mind that this night table is fairly low. My daughter is just over a year so it will be perfect height for right now. In the future I will add a bottom piece of wood with some taller casters to bring it up even higher for her.
Now the price for the parts of the kitchen can go both ways. If you look for items at second hand shops or the dollar store this can really keep the cost down. You will notice that some people will use real bathroom faucets and depending on if these are purchased new or used can really make a difference. It's your design so you decide what is best for you. I decided to buy new hardware for Ashtyn's kitchen since we had a gift card for Rona.
Here is a break down of what I used
* Two RAST tables from Ikea * Stainless steel bowl for sink
* PANNA coasters from Ikea for the burners
* A Plumbing pipe for the faucet found at Home Depot or Rona * Oven Handle and knobs found at Home Depot or Rona
Don't forget the little things in which your hubby or yourself might already have
* Wood glue
* Screws
* Hinges and magnetic catch for the oven door
* Sander or Sandpaper
* Jig saw
* Drill
Here's some pics of my project in process
The oven door with the little window ready to cut
The cuts are made... now for the sanding
The oven door with it's cute little handle and peek in window....perfect for checking on your cupcakes!!
This is my splurge accessory. A cute little spoon handle for Ashtyn's tea towel
The backsplash with shelf and Ikea hanger
Every little girl needs a stainless steel kitchen with a flat top stove...
And a utensil rack..

Here is Ashtyn's play kitchen in it's new home....her bedroom. She absolutely loves it and played with it for an hour this morning. This project was a SUCCESS!!
As Ashtyn gets older I will give her some letter magnets and paper and she can make her own grocery lists.
I hope you enjoyed looking at my favourite craft project...maybe I even inspired you to make your own wooden kitchen. If you've made a wooden kitchen I would love to see your pics.








.JPG)




.JPG)
.JPG)
.JPG)
.JPG)
.JPG)
.JPG)