Tuesday, December 1, 2009

ChRiStMaS CLiPbOaRd CoUnTdOwN

I made these last year and to tell you honestly I forgot about them until I opened up one of my Christmas boxes.  They were fast and easy to make and a perfect size to display on a fridge. I used a small clipboard I purchased from the dollarstore and decorated it with a Christmas scrapbook paper package by My Minds Eye. For the numbers I used white tags purchased from Michaels with Memory Makers number stickers. You could also use number stamps. I hot glued two metal washers to the the front of the clipboard where the numbers go and magnets to the back of each number tag. Good old Mod podge was used to stick down all the paper and to cover the stickers on the tags so they don't fall off in the future. Give the clipboard a final coat or two of Mod podge to seal it all up, add some magnets to the back of the clipboard, pop it onto the fridge and start countin' down the days!!!
Since it's December and we're ready to officially start counting down the days until Christmas I thought I would also share some other great Christmas countdown ideas I found while blog jogging.

Countdown Blocks found on Little Birdie Secrets Blog. There is a how to tutorial with lots of pics. I'm thinking this craft looks easy enough to make so why stop at Christmas? Make them for a Halloween countdown or Baby Blocks.


Little Tin Advent Calander by Split Coast Stampers, with a tutorial and how to pics.
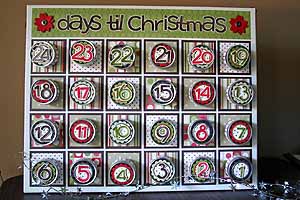


Magnetic Muffin Tin Advent Calendar by Stephanie at her blog Somewhat Simple also with a tutorial and how to pics.


*Merry Christmas and Happy Craftin'*



TIPS FOR TOTS TUESDAYS...due to launch Dec. 8th

So I was laying in bed last night trying to fall asleep when I had visions of blog ideas running through my head. (hey that kind of sounded like a line from 'Twas the Night Before Christmas'). Then it came to me, why don't I start a weekly post called Tips for Tots Tuesdays,where I can share a song, activity, or craft idea to be used with little ones. Before I had my daughter and became a SAHM I worked as a preschool teacher based out of an Elementary school. During those years I accumulated a lot of stuff, and I mean a lot. Lets just say that probably a quarter of my basement is housing colourful rubbermaid bins labelled Halloween, Family, Zoo Animals etc etc. They are filled with songs, craft ideas, felt stories and other things to keep active young minds fresh and stimulated. Instead of sitting in bins I should be going through them and sharing them. If I can't teach in person I may as well share what I know on my blog for others to use. In turn I would also love if people could leave me comments of activities they have done with their little ones in the past. I know that someday I'll be going back to do what I love to do. In the meantime I have the wonderful opportunity of enjoying my own child at home. So stay tuned for Tips for Tots Tuesdays starting a week from today.

Monday, November 30, 2009

My New Grab Button...oh la la

It was my blogging goal and I finally did it. I created my very own Crafty Chic Mommy button and added it on my blog for others to grab if they choose to. I thought I would share how I did this in case there are others who have no clue how to do it like myself. I found the easy instructions on The Cutest Blog on the Block.

I did find it took me a few tries to get it right and I ended up double checking my code with the example in the instructions. In the end I had to take out a few forward slashes that were in the code right before where you post your information. I hope this info is useful to you.

Here is my new button! Feel free to grab it and put it on your blog if you like what you see! It would make me one happy mama!


CraftyChicMommy


Sunday, November 29, 2009

Find It for Cheap in the U.S.A

Well we're back from our weekend in the States where we enjoyed cheap shopping and cheap beer. Well my husband enjoyed cheap beer, and we both enjoyed cheap shopping. It never ceases to amaze me how much more we pay in Canada for our alcohol, food, gas and everyday items. I'll give you an example: an 18 pack of beer here is $29.99 (plus we pay 10 cents deposit per can) and in the U.S an 18 pack is a measly $8.99 (at least where we found it this weekend it was). The alcohol content is the same and I'm sure it's made at the same factory. 

Not only are the prices so different but the variety in the States for something so simple like marshmallows can leave you scratching your head in aisle 9 of Walmart thinking to yourself, should I buy strawberry marshmallows or coconut? Here in Canada you're just going to be buying the plain old marshmallows because that is all there is to buy. Don't get me wrong, I'm a proud Canadian, I just don't get why we pay through the nose for our stuff here. Ok well I do know why, it boils down to the government taxing Canadians for everything in order to pay for public health care. I'm apprecitive of our health care system but it doesn't change the fact that I hate paying top dollar for a pathetic bottle of wine. 

Well that said, we made it to the Carters half price sale, everything in the store for 50% off. If that happened here people would be trampling one another to get into the store and it would most likely make the top story on the evening news. So with the Canadian dollar strong and the U.S border just 15 minutes away call me a proud Canadian who likes to spend her time and money in the U.S.

MOMMY JEWELRY...a site worth checking out


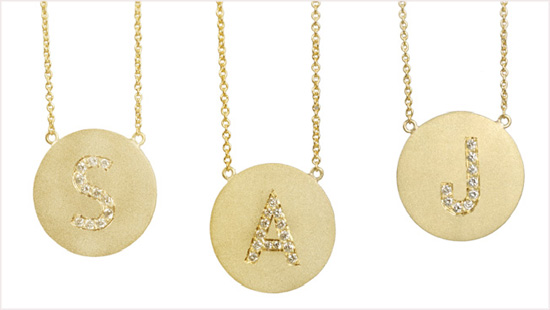
My girlfriend recently found this company's ad in the back of an US weekly magazine and ordered a pendant from there with her son's name and birthdate on it. The company is called Mommy Jewelry. It turned out great and it's something she can proudly wear to celebrate the love of her son. I checked out the website today and was surprised to find that they have lots of different designs to choose from at very reasonable prices. They also offer their jewelry in both sterling silver or gold to accommodate anyones price range. I thought I would share this great site with you. Hey ladies perhaps it's something we can put on our Christmas wish lists. I wouldn't mind a round pendant with my daughters first initial on it (just in case my hubby happens to read my blog...he he). I also noticed today while thumbing through my old People magazine that Nicole Richie wears a gold pendant exactly like the picture below, to represet her daughter Harlow.


I looked it up and it costs $1250.00. Yikes!! So for those of us with champage taste on a beer budget, mommy jewelry might just be what we were looking for.


Friday, November 27, 2009

Cheap and Chic Scrapbook Paper Frames...try saying that three times fast!

These DIY frames are cute, easy and fun to create. Best of all they make great gifts year round for any occasion. The style choices are endless since they are covered with scrapbook paper. I say there is a scrapbook paper out there to match anyones style.

SUPPLY LIST
* Unfinished wooden frame ( I purchased these from Michaels for $1.50, I think they are $1 in the States). These ones are 8 x 8.

* Scrapbook paper of your choice (I used My Minds
Eye Sweet Dreams Holiday Ave Collection)

* Mod Podge and foam brush
* Craft knife

* Sandpaper or sanding block ( I find a nail file can work in a pinch as well)

* Ink pad, stain or paint

* Embellishments (optional)
INSTRUCTIONS

1. Start by taking the picture part out of your frame.
If you want the sides and back of your frame to be a certain colour then give them a nice coat of acrylic paint or stain them and let dry. Leave the front of the frame unfinished. For my frames I left them unstained until I stained them with my ink pad in a later step.

2. Next cover the front of the frame with a nice even layer of mod podge. Let that dry for a minute and add another layer. I think of the first layer as a primer so the second layer has something to stick too and not just soak into the wood.
3. Place your paper down onto the frame and press down, turn frame over and run a roller or credit card over the paper to smooth out any bubbles.
4. Turn over the frame and once paper has set (about 10 min), begin trimming the excess paper from around the frame and inside of the picture part. Don't worry if it's a bit sloppy, next we will be sanding the edges a bit.
5. Sand the edges of the frame as well as inside where the picture will go.
6. Once you are finished sanding you will be left with some white areas on the paper. Take your stain or ink pad and cover these areas. In order to get to the small tight areas on the picture part of the frame I dip some paper towel into my ink pad and then dab onto these hard to reach areas. Let the ink dry.
7. Lastly cover the front and sides of your frame with two coats of mod podge. I let the frame dry 10-15 minutes between each coat.

And there you have it some cheap and chic DIY frames. Have fun, and don't forget to make some for yourself. They look great in a set of three!!

Here's some pictures of the ones I made.


A MUST VISIT...YOUR BLOG WILL THANK YOU FOR IT

If you havent done so yet, you must check out Shabby Blogs for some fantabulous finds for your blog. Do you like my background, how about learning how to add a cute little post divider. I found all this plus more  at 

So what are you waiting for? Go go go get your design on. Oh and don't forget to check out Amanda's Shabby Blog for lots of free designs and tutorials.


Thursday, November 26, 2009

FUNKY LUNCH

So do you have a picky eater?  I'm happy to say that so far I don't, she has actually earned the nickname garbage guts!  But if you do how about creating some of these amazing snacks for kids found at Funky Lunch?  I remember doing stuff like this when I taught preschool and it was amazing to see the picky children eating something they nomally didn't like because it was aesthetically pleasing to them.  Have a look at what can be created from different snack foods and maybe they will get your creative juices flowing for tomorrow at snack time.  Pretty Cool!!  View the rest of the gallery here.  And if you've already created a sandwich masterpiece then you can submit it to Funky lunch's sandwich competition.   The contest closes December 12th.


BLOG ROLL PLEASE.....


CRAFT BLOGS
CraftyChicMommy
Photobucket
U Create
brown paper packages
Making
The Shabby Chic Cottage
ASPTL
BCD 125


HOME DECORATING BLOGS
projectnursery

RECIPE BLOGS

RESOURCES FOR CHILDREN
Childmade

MOMMY NETWORKING BLOGS


Proud member of MommyBlogs

Top Mommy Blogs - Mom Blog Directory


Related Posts with Thumbnails