Showing posts with label Tips for Tots. Show all posts

Friday, September 2, 2011

MiNi Boo Boo Box


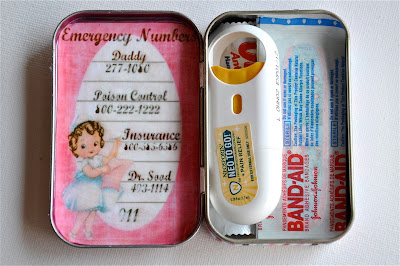
We all know if you have kids then your bound to have boo boo's, so I recently whipped up this Mini Boo Boo Box to carry around in my purse.

I started with an empty Altoid mint container and covered it with paper and ribbon. I gave the top a coat of matte Mod Podge to seal and protect the paper.

On the inside I included important emergency numbers and filled it with some Poly spray and bandaids.


I'll probably add some small candies or stickers as well. They usually work wonders when little ones get hurt.

Looking for more inspiration???
Check out these other great boo boo box's.


Psst I'm linking up to

Wednesday, November 17, 2010

FIVE GREEN AND SPECKLED FROGS

Have you heard the little children's counting song, "Five Green and Speckled Frogs?"

It's a favourite in my house and was always a bit hit while I taught preschool. To help bring the little song to life I made 5 magnetic felt frogs and found a "speckled log" in the park for them to sit on. Now your little one can help you sing the song using her props.

Here's the Low Down

1. Cut out ten pieces of green felt in a froggy shape.

2. Decorate the front side however you wish adding googly eyes and speckly skin. For all my felt stories I use fabric paint.
3. Next your going to glue the two felt pieces together with cotton balls and a magnet on the back of the frog INSIDE the felt.
Do this for all five frogs.

4. Take your clean"frog log" and hot glue five magnets to it.
***** Remember that magnets either attract to one another or push away so make sure that all frogs will have a place to sit on the log before you glue the magnets on. I learned this the hard way once....gulp.*****
5. Cut out a piece of blue felt in the shape of a pond for the frogs to jump into....
 For those who don't know the
Five Green and Speckled Frog song, here it is....

"Five green and speckled frogs sat on a speckled log,
eating some most delicious bugs....yum, yum!

One jumped into the pool where it was nice and cool,
Now there are four green speckled frogs....glub, glub"!

Continue to count down until all the frogs are in the pond....


Wednesday, October 27, 2010

Storage Cupboard Turned Play Fridge

 I was going to build my daughter a play fridge to go with the kitchen set I made for her but I got lazy and took the easy way out. Here is what I did... I'm very happy with my results.
I found a little white storage shelf while shopping at Rona the other day ( Rona is a Canadian Home Depot basically). So I decided instead of sawing, sanding gluing and nailing, I would turn the basic little two shelf cupboard into a play fridge.

To give it that extra special touch I lined the shelves with drawer liner paper.....
I gave it a new fridge like handle....
And to cover the holes where the original handle would've gone I attached a little wooden magnetic board covered in fabric.


 Ashtyn loves her little fridge and in the end I saved myself time and money!!

To see my original post on how I made Ashtyn's stove and sink click HERE


Thursday, June 24, 2010

SUMMER IS HERE....LETS GET MESSY Part I


OoBLeCk ReCIPe

"Oobleck is a non-newtonian fluid. That is, it acts like a liquid when being poured, but like a solid when a force is acting on it. You can grab it and then it will ooze out of your hands. Make enough Oobleck and you can even walk on it"!

"Oobleck gets its name from the Dr. Seuss book Bartholomew and the Oobleck where a gooey green substance, Oobleck, fell from the sky and wreaked havoc in the kingdom".

MATERIALS
2 cups corn starch
1 cup water
a bowl
 food colouring (optional)

MIX EVERYTHING TOGETHER IN A BOWL....THEN PLAY

This stuff is great cause it washes off easily with water and is non toxic for curious little tasters!!

WARNING: Adults will have fun playing in this too


Tuesday, April 6, 2010

TIPS FOR TOTS TUESDAY - Park Scavenger Hunt


Now that Spring is officially here, we're all looking for new and exciting ways to enjoy the outdoors with our children. Every year while teaching preschool I would take my class (accompanied with a parent) to our local park for a Scanvenger Hunt. It was free and fun and taught the children that there is more to a park then just the slides and swings. This activity is best done with children 3 and older, however, I've seen younger siblings on the field trips tag a long just fine.  

Here's What You Do
 Create a list of things to look for or activities to carry out at the park. Don't forget to include play time on the play equipment or else this activity will fail. Think of it like walking into a coffee shop only to smell the aroma but not being able to buy a yummy drink.

 Now your list will depend on the park you visit. The next time you visit the park look around for things you can add to your list.

Here are some examples we used on our fieldtrip. We stapled our list to a brown paper bag and gave a bag to each child. If you would prefer to leave the objects at the park then just scrap the bag and bring a list and crayon to mark your progress.

Find a smooth rock
Find a rough rock
Go down the red slide three times
Find a leaf bigger than your hand
Find 3 pinecones
Count all the swings in the park
Count the baby ducks
Find a twig on the ground, where do twigs come from?
Find a flower, what colour is the flower?
Look for a bug of any kind, what is that bug doing?


Not only does this activity teach a child that a park is a home to many animals and birds, it also promotes language and conversation between you and your child. Be sure to ask them questions and describe as much as they can understand as you go along.

Don't worry if you only get through half your list. This is meant to be fun and non stressful for you and your child. You can always finish your list another day. 


EXTRAS
* Bring along a camera and take pictures as you go. You and your child can then make a nature book together at home using the pictures from the park.


* Provide your child with a magnifying glass to take a closer look at their findings from the park at home.

Tuesday, March 30, 2010

TIPS FOR TOTS TUESDAY - Crayon Cozy Tutorial


Last weekend our family went out for breakfast. Gone are the days of relaxing conversation over a fresh cup of coffee and eggs benny.....we have a toddler people. Basically we're chugging our coffee to keep it from being spilt and gobbling our food as fast as we can to get the heck out of the place. 
Life must go on and we still want to enjoy the odd dining out so I decided to make Ashtyn a crayon cozy to help keep her entertained.

Since I have so much felt left over from my felt play house I decided to use that for the material. Really in the end it was a better choice for me since I didn't have to worry about finishing the edges.

What you'll need


Two pieces of felt
Ribbon
Pinking Shears
Crayons
Pad of paper


1.  Cut out two pieces of felt. When deciding what size make sure to factor in how many crayons you want your cozy to hold and how big your pad of paper is. My cozy is 5 inches by 9 inches in size.

2. Next cut out a piece of felt to hold your crayons. I wanted my cozy to hold four crayons so I cut it 4 iches by 3 inches.

3. Sew a piece of ribbon along the top to prevent the felt from stretching when the crayons are put in and out of their pockets. Take your pinking shears and pink down the sides for a nice decorative touch. Note: I figured doing this would prevent my ribbon from fraying but this wasnt so, in the end I ended up using a match to seal the ribbon ends a bit.

4.  Next sew your crayon pocket onto the felt backing. I started by sewing a straight line down the middle (backstitching for reinforcement) and then working my way to the sides to make the pockets for the crayons. I left a 1 inch space between each line to hold the crayons comfortably. I used a piece of tape to show me where I needed to sew.

5. Sew around the sides and the bottom of the felt pocket to secure it to the big piece of felt.


6. Cut another piece of felt that will snuggly hold a small pad of paper. I found some cute little pads of paper at Michaels with the cardboard backs on them to easily slide behind the felt pocket.
Sew down both sides of the felt leaving the bottom and top open.


7.  I decided to put my logo on this project using this printer friendly cotton that I purchased at Michaels. The cotton has a hard removable backing on it to allow it to be used like normal paper in a printer.

8. Now that the note and crayon pockets are sewn on it's time to sew the front and back pieces of felt together. Pink around the edges first then slip a piece of ribbon at the edge of each side to allow the cozy to tie together.
9. Thats it...your done. Now fill it with crayons, paper and a few stickers and pop it into your purse for the next visit to the doctors office or breakfast rendevous.


I'm linking this to

Tuesday, March 9, 2010

DIY KIDS BUSY BOOK - TIPS FOR TOTS TUESDAY

Last week I was busy making my daughter her very own busy book. I've seen these made a lot with fabric and felt but I thought I would put my Cricut to use to make Ashtyn a cardstock busy book. I saw another cardstock busy book on one of the blogs I follow but it was a while ago and for the life of me I can't remember which one it was. If it was you then let me know so I can give credit where credit is due.


I laminated the pieces and pages for durability and used velcro so the pieces stick and can be moved around easily. I started with a few simple pages and will make more as Ashtyn grows.   
I'll be sure to post my new creations as I go.

Here's what I've done so far.


On the back of each page I included a poem or song to coordinate with the theme of the page.


Related Posts with Thumbnails