Wednesday, December 29, 2010

Top Ten Posts of 2010!!

As 2010 draws to a close I thought it would be neat to share my top ten most viewed posts from the year.

I also wanted to say thank you to my cherished readers for taking the time out of your busy lives to read my little blog. I hope I have inspired you to CrEaTE something wonderful in the past year.
As we head into the new year you can be sure that I'll have lots more crafty tutorials to share.

#10. Christmas Clipboard Countdown


And my #1 post of 2010 was my

Happy 2011!!


Wednesday, December 22, 2010

MeRRY ChRiSTmAS FRoM CrAFTY ChIC MoMMY

Just wanted to wish you...My Wonderful Readers, a very Merry Christmas and a Happy New Year!!

This Christmas we are spending Christmas at the Happy Place on Earth....Disneyland!!

Saturday, December 18, 2010

Wooden Crate With a Story

While antique store searching the other day I purchased a small unfinished crate for a couple bucks. It basically looked like these. Pretty boring and plain

With a little stain {Mini wax dark walnut}...
Lots of sanding....
And a stencil cut with my Sure Cuts a Lot Software..
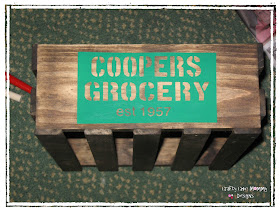
I came up with this..

Now for the story....Coopers Grocery store is where my husband and I met almost 11 years ago.

The number on the back of the crate represents our first date...April 27th, 2000.
For now the newest crate of our family sits on our table housing some very BRIGHT Christmas balls. Sorry for the blindage people.

Friday, December 17, 2010

Guest posting at U Create Kids

Hey everyone, I wanted to take a break from Disney packing to let you know that today I'm guest posting over at
U Create Kids.

You read it right, the blog we all know and love {U Create} now has U Create with kidsU Create Food and U Create Parties.

Jump on over to U Create Kids to check out my mason jar snow globe tutorial
Merry Christmas!!

Thursday, December 9, 2010

DIY CANDLE STANDS

I came across two great candle stick tutorials at DRAB to FAB and BROWN PAPER PACKAGES

I just had to make me some of these for my front entrance and guest bathroom.
You can make some too....they're super easy to do.

{WHAT I USED}

* a piece of 4x4 wood cut into any height you fancy
I made a set of three pillars
* six pieces of 5 x 5 wood for my tops and bottoms
Or you can use a fence topper like I was originally going to do...then I changed my mind
Sand all your wood using this little miracle worker.
It's definitely something to put on your Christmas list if you're planning on more wood working projects.
I assembled all my tops and bottons to my
4 x 4 using my Weldbond glue.
Normally I would've painted these using my Rustoleum "flat black" spray paint however, it's way too cold for that, so instead I used Behr "Black Suede" Satin paint from Home Depot.

As you can tell I didn't do a great paint job since I knew they would be distressed once dry.
Ohhh I love this part....take your sweet sanding friend and distress those candle holders. You see, I like mine very worn looking so I went CrAzY with my sander.
 UPDATE: I decided to stain my candles with Mini Wax's walnut brown stain and I'm SO happy I did. They look so much better.

{BEFORE THE STAIN}

{AFTER THE STAIN}


I just need to find the perfect candles but these will work in the meantime.


I'm Linking to


Tuesday, December 7, 2010

SHANTY TO CHIC'S LARGE VINTAGE DICE

This project has been on my to craft list for quite sometime and I finally tackled it with my left over 4x4 scraps from another project I'm working on....coming soon.

 These would make a great gift for the game lover in your family, which in my case would be my hubby.
I found this idea over at Shanty to Chic, but before you head over to read the tutorial I should mention that I had to improvise a little on my dice.

To my dismay I couldn't find the Ralph Lauren Smoke glaze that Shanty to Chic uses on most of their projects {apparently discontinued??}. Instead I used a medium brown stain {paint on then wipe off} 

On my edges I used this ink
If you don't have an electronic cutter to make the circles then use a craft punch. 

HaPpY CrAfTiN'

Monday, December 6, 2010

Mason Jar Soap Dispenser {the cheap and shabby way}

While browsing through one of my favourite gift stores I came across one of those Mason jar soap dispensers with a $30 price tag....ouch.
Yea sure it looked all professionally done and all but seriously 30 bucks.

Today I made one for my kitchen and bathroom...

Warning the DIY soap dispenser tutorial you are about to view is very shoddy. But it worked for me in a pinch and can work for you too saving you about ahhhh $29!!
Besides who sees the bottom of the soap lid anyways...

Grab yourself a mason jar and an old pump from a cream bottle or soap dispenser.
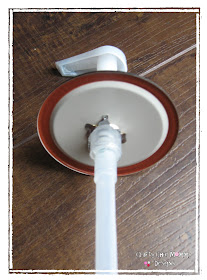
Take a pair of these babies...yup needle nose plyers and make a hole in the top of your lid.
Once you have a hole started make it big enough to fit your soap pump by rotating and pushing the plyers through....
You want your soap pump to fit in the hole snuggly so check for fit as you go.

On the underside of my lid I hammered down my metal pieces so they didnt stick out.
See I told you this was shabby...

Trim your pump at the bottom to fit your jar and voila...a Mason Jar soap dispenser!!