Saturday, September 17, 2011

Drop Cloth HaLLoWeEN Pillow

I'm jumping on the Halloween train early this year so I can make the most of it.

Besides with our new addition set to arrive soon I'll be consumed with diapers and drool rather than crafts...

I used a drop cloth from Home Depot to make this pillow.

I decided to try out Martha Stewarts new paint line for my green and orange lines. It worked great....just a little stinky for my sensitive pregnancy nose. This stuff apparently works on any craft surface including glass.

Using painters tape I taped off my lines on one side of the pillow and painted with a foam brush between the lines.

While that was drying I ironed on my TriCk Or TrEAt iron on that I found at Michaels onto a smaller piece of drop cloth.

My patch was sewn on using a zig zag stitch then I was ready to assemble my pillow.

I sewed all the way around the edges on the front side leaving about a 4 inch gap on one end.
I stuffed the pillow with Poly fill and sewed the opening shut.


Here's how she turned out!!
Happy Fall Ya'll!!!


Pssst I'm linking this project to....

Friday, September 16, 2011

BURLAP WREATH

I've seen these and many other burlap wreaths all over blog land and decided I needed one of my own for my fall / Halloween decor.

I started this wreath with a wire coat hanger shaped into a circle (this was the hardest part)

I then cut strips of burlap about 4 inches in width and about 4 feet long.

I'll admit this took more burlap than I thought to make it look full....like about a yard and a half give or take.
(sorry no pics I did this late at night spur of the moment in my poorly lite basement)

I folded and threaded the burlap (like an accordian) onto the coat hanger and scrunched and folded over and over until my wreath looked full. I pulled my threads to give it a messy look once I was done.

I secured the edges of the coat hanger with some wire and added a piece of fabric to hang it.


I'm not too sure how I will decorate this sucker for Fall or Halloween yet so in the meantime I pinned this little spider on.


I'm even thinking of making these darling little pumpkins to pin onto it that I found over at
SMILE MONTSTERS


Pssst Im linking this project to...

Monday, September 5, 2011

DIY BABY MOBILE


With our little guy set to arrive next month, I've been finishing off some goodies for his space which include this MoBiLe!!


Here are the supplies I used for my mobile...
the yellow rings are embroidery hoops and I purchased the pre cut wooden pieces from Michaels.

 I also used a dremmel tool to make holes in my wood to feed the string through and metal washers. (not pictured) 


Using good old Mod Podge I glued my scrapbook paper onto my wooden circle. Once it was dry I used my scalpal to trim off the excess paper.


I found these adhesive letters at Michaels. I thought they were kinda cool and they end up leaving light spots on the wall when the sun shines.


My mobile turned out how I envisioned and in the end cost me under $10 to make....bonus!!


Friday, September 2, 2011

MiNi Boo Boo Box


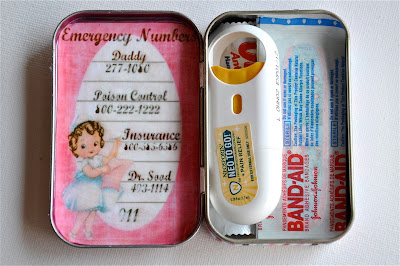
We all know if you have kids then your bound to have boo boo's, so I recently whipped up this Mini Boo Boo Box to carry around in my purse.

I started with an empty Altoid mint container and covered it with paper and ribbon. I gave the top a coat of matte Mod Podge to seal and protect the paper.

On the inside I included important emergency numbers and filled it with some Poly spray and bandaids.


I'll probably add some small candies or stickers as well. They usually work wonders when little ones get hurt.

Looking for more inspiration???
Check out these other great boo boo box's.


Psst I'm linking up to

Thursday, September 1, 2011

P.B K.O. GIANT RULER GROWTH CHART


Try saying that 3 times fast.
I came across this great post by 517 Creations and I immediately got down to business making my own.
It's inspired by a Pottery Barn ruler that probably sells for one pretty penny.
In the end I liked my $8 one much better.

I purchased a 1x6x8 piece of board from Home Depot and cut it down to 5 feet.

After sanding my board, I stained it using some stain I had left over from some other projects.
The stain is very similar in colour to the Mini Wax special walnut stain.

Two coats later and I was ready to make this board look like a ruler.

I was going to use a felt pen to draw on the lines and numbers but instead I took the lazy easy way out and did it with my Cricut and extra sticky vinyl. The font I used was Century.


I marked an inch up the side of my board and placed a strip of black vinyl in different lengths like a real ruler. Every 12 inches I added a number.
I hung it two feet from the floor since I started with the number two on my board.


This can be used as an actual growth chart (which I plan on using it for) or would look cute in a craft room!!
Psst I'm linking up to
Related Posts with Thumbnails