Saturday, February 27, 2010

Felt Play House Along


So I'm sure most of you have seen these, drooled over these, or have been tempted but intimidated to make one of these. They are card table felt play houses and they are ADORABLE.


I originally saw this idea when my daughter was first born and can I admit it was the furthest thing on my to craft list. Now that my daughter is almost a year and a half she is starting to love cozy little spaces. And lets face it my makeshift fort in the living room is just not cutting it. 

They are designed to slip right over your kitchen table or other table you may have in your house to make an instant play space for your children. Don't worry if you don't have a table that would work for this....you can also build an instant frame using PVC pipe. This also makes it transportable to the backyard or to Grandma's house. 


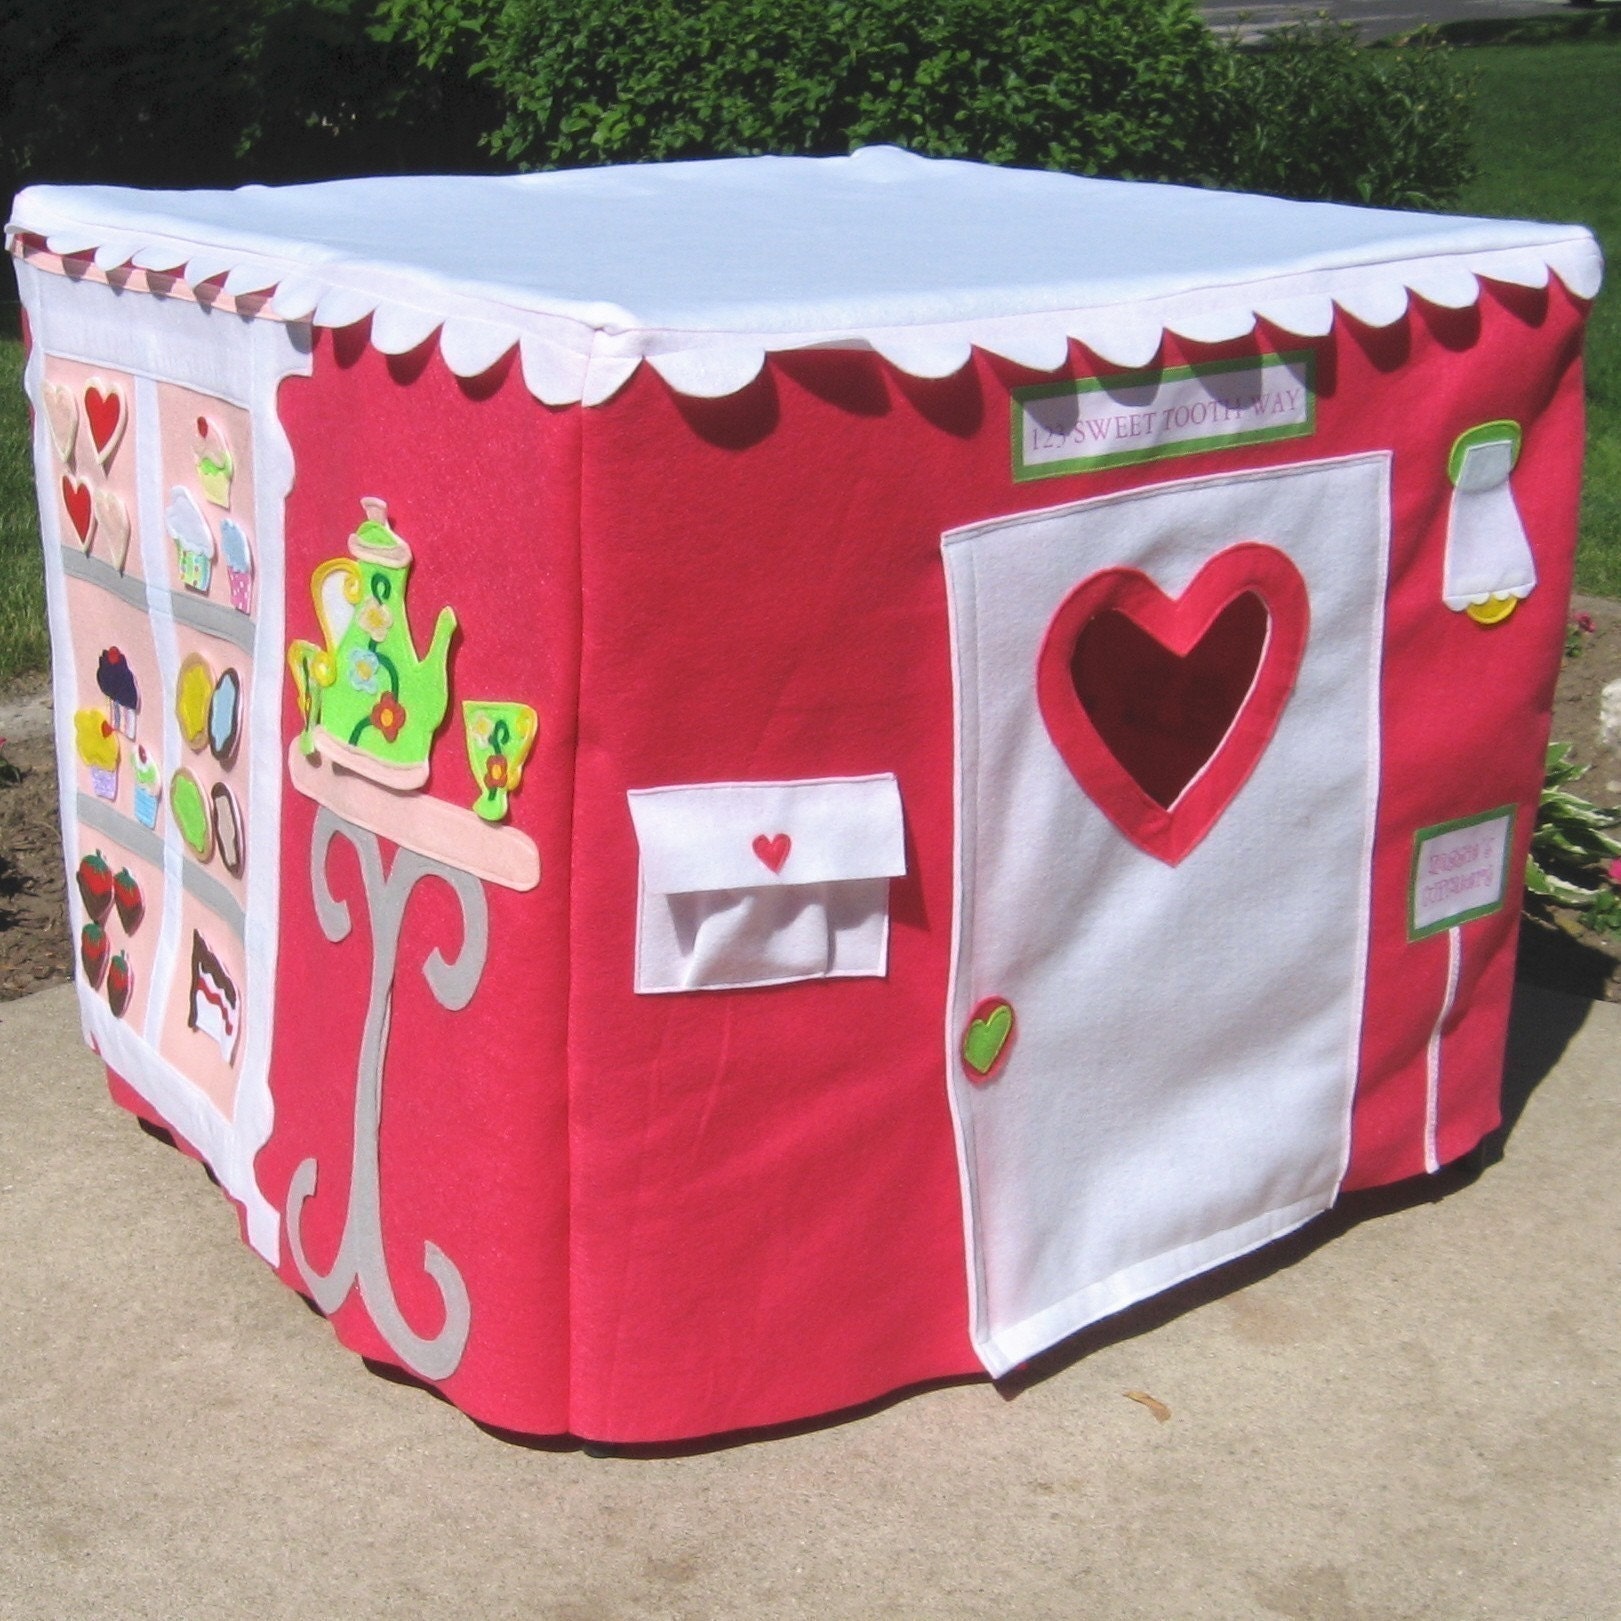
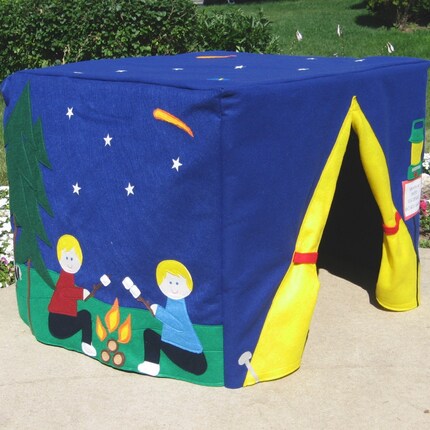
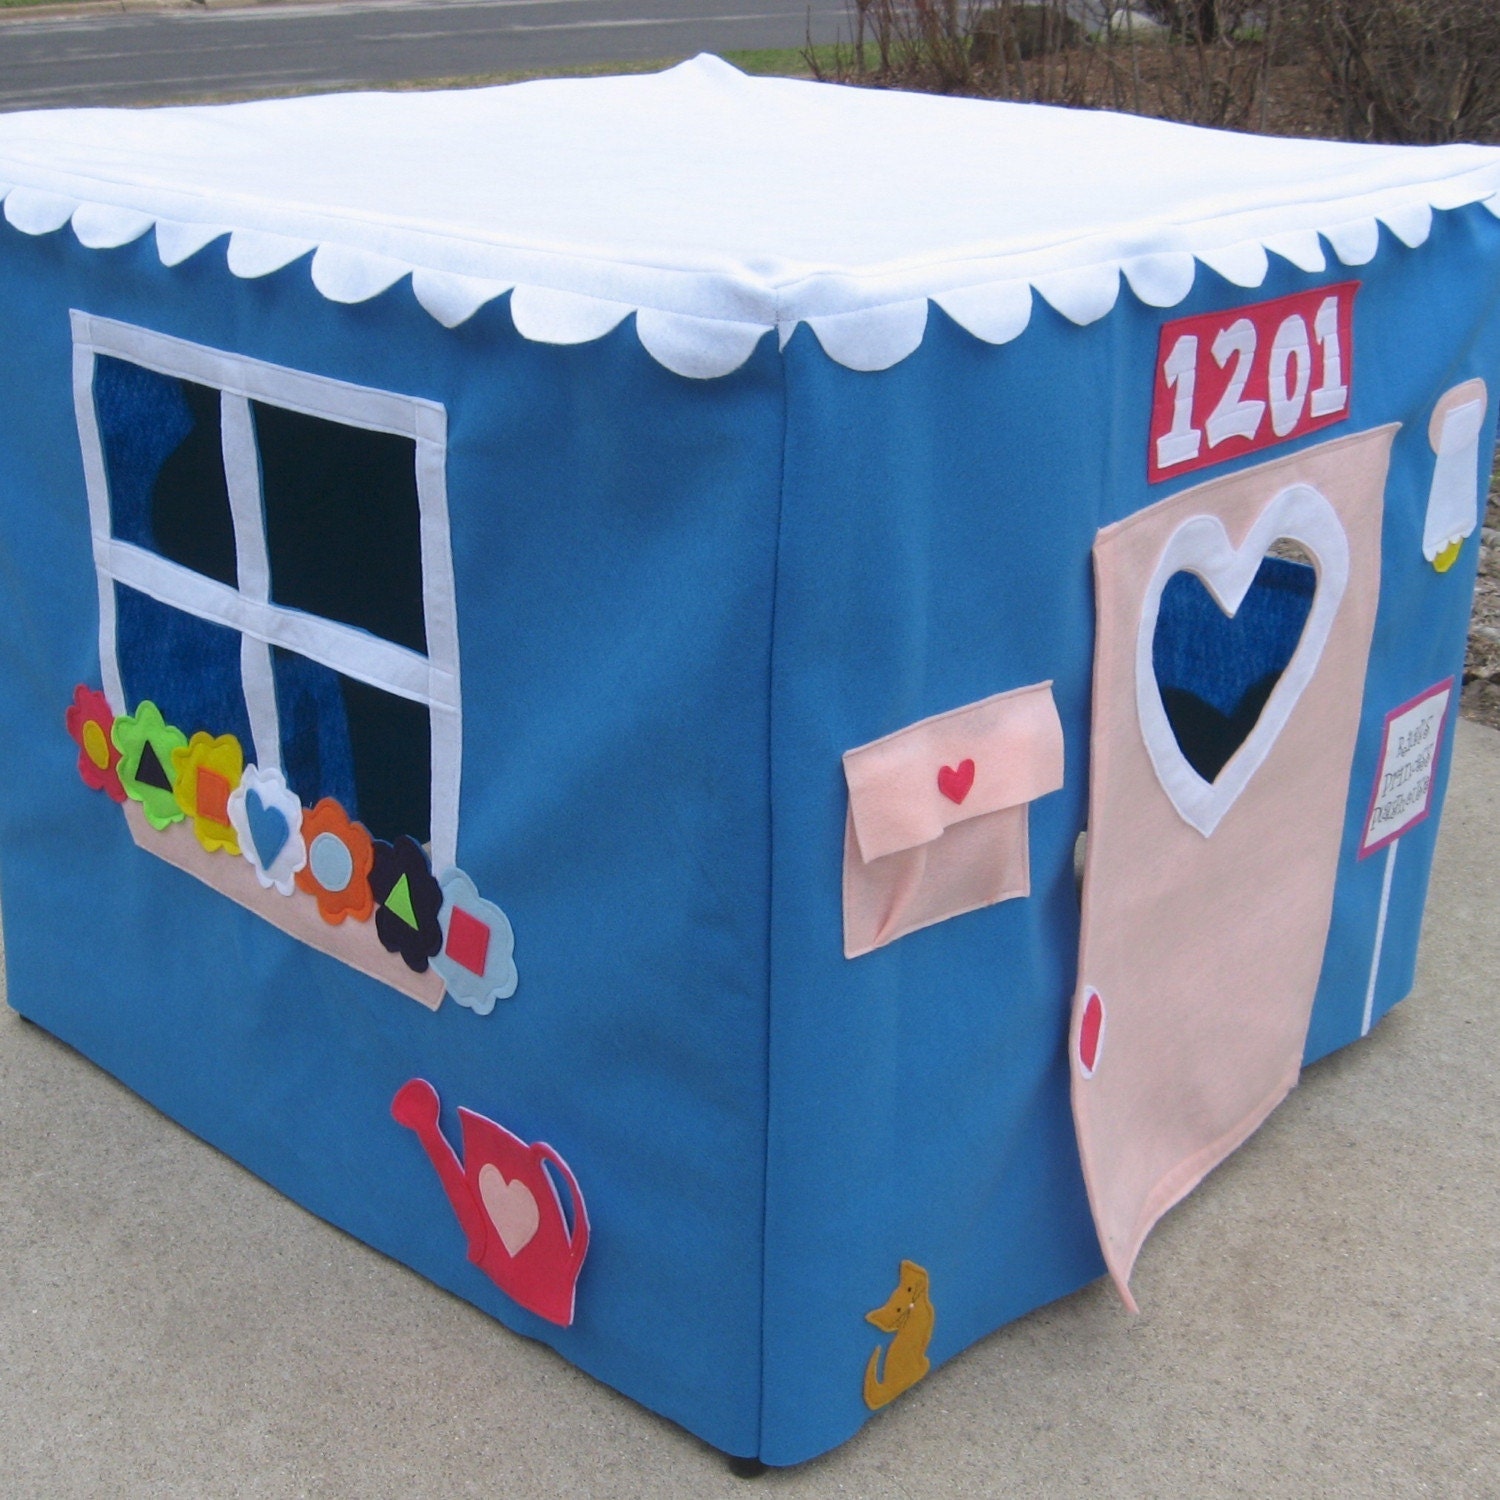
For those of you wanting to purchase a lovely felt play house then look no further than Imaginative Play Toys. Here are some of my favourites.


So you're not really into spending the big bucks, you can sew a straight line and you want to make something your children will LOVE then head on over to Fireflies and Jellybean Blog where they are doing a


It's a five week process walking you through the steps to make a felt playhouse. The best part is you can make it as simple or as elaborate as you want....I've seen felt houses with removable parts on the outside such as fruit for the tree and veggies for the garden. This is the closest I'm ever going to get to picking the colours for a house being built...tee hee. 


Next weekend I'm heading to the US to hit up a Joann's for some affordable felt and then I'm getting down to business. I'll be sure to post pics as I go along...if all goes well. 
 I sure hope you will join in on the fun!!

Here's some other great felt play houses to get your creative juices flowing and to inspire you!!


Tuesday, February 23, 2010

CREATIVITY WEEK @ Seven-Thirty-Three Creative Blog


It's CREATIVITY WEEK  at 7-3-3 Creative Blog.

Head on over there to check out Kim's blog where she will be featuring an array of guest posters sharing their wonderful crafty talents. I might even sneak a tutorial in there. A week of crafts and GIVEAWAYS = one kick A** week... so go check it out.


TIPS FOR TOTS TUESDAY - GUEST POST


Hello my lovelies, today I'm guest posting over at TWO SHADES OF PINK BLOG.
 I was honoured when Jessica asked me to be her first guest poster for her TWO TIPS TUESDAY FEATURE....."uh yeah" I said "of course I'll guest post on your totally WONDERFUL blog".  I'm featuring my 5 minute kids placemat apron tutorial. It's easy peasy, cheap and looks adorable on your little one. If your interested in guest posting on TWO SHADES OF PINK drop Jessica a line while your visiting.

I'm off to work on a new craft project in which I'll be posting soon!!


Sunday, February 14, 2010

MY CUTE DIY WOODEN KITCHEN


This is probably my best craft project EVER. Usually I make crafts that sit on a shelf or hang on a wall and sure they are great but nothing compared to the joy this will bring my daughter and if I built it well enough maybe her kids too.

So let me just come out and say that I didn't INVENT this idea. Who knows who did....just like who knows who invented Mod Podge tile coasters?? One night I decided to google wooden play kitchens and I came across the pics below. Immediately I knew this was at the top of my to craft list. These adorable pics I found on Ohdeedoh and Flikr jumpstarted this project.


Ok lets get down to details already. I was originally going to make an all in one kitchen like the pictures above. However, I wanted Ashtyn to have a bit more space for her collection of kitchen goodies. I purchased two IKEA RAST night tables, one for the stove and oven and one for the sink, counter and storage space. The RAST is $19.99 in Canada and $14.99 in the US. If your wanting to make it more affordable then just make an all in one kitchen like the pics above.

Also keep in mind that this night table is fairly low. My daughter is just over a year so it will be perfect height for right now. In the future I will add a bottom piece of wood with some taller casters to bring it up even higher for her.
Now the price for the parts of the kitchen can go both ways. If you look for items at second hand shops or the dollar store this can really keep the cost down. You will notice that some people will use real bathroom faucets and depending on if these are purchased new or used can really make a difference. It's your design so you decide what is best for you. I decided to buy new hardware for Ashtyn's kitchen since we had a gift card for Rona.

Here is a break down of what I used

* Two RAST tables from Ikea
* Stainless steel bowl  for sink
* PANNA coasters from Ikea for the burners
* A Plumbing pipe for the faucet found at Home Depot or Rona
* Oven Handle and knobs found at Home Depot or Rona
* Extra piece of wood to make back splash, shelf and oven door also Home Depot or Rona
* IKEA BYGEL Rail , GRUNDTAL S hooks and BYGEL cutlery hanger to hang untensils from

Don't forget the little things in which your hubby or yourself might already have
* Wood glue
* Screws
* Hinges and magnetic catch for the oven door
* Sander or Sandpaper
* Jig saw
* Drill


Here's some pics of my project in process

The oven door with the little window ready to cut

The cuts are made... now for the sanding

The oven door with it's cute little handle and peek in window....perfect for checking on your cupcakes!!
This is my splurge accessory. A cute little spoon handle for Ashtyn's tea towel

The backsplash with shelf and Ikea hanger
Every little girl needs a stainless steel kitchen with a flat top stove...
And a utensil rack..


Here is Ashtyn's play kitchen in it's new home....her bedroom. She absolutely loves it and played with it for an hour this morning. This project was a SUCCESS!!


As Ashtyn gets older I will give her some letter magnets and paper and she can make her own grocery lists.
I hope you enjoyed looking at my favourite craft project...maybe I even inspired you to make your own wooden kitchen. If you've made a wooden kitchen I would love to see your pics.

Tuesday, February 9, 2010

TIPS FOR TOTS TUESDAY- 30 Printable Valentines


The Long Thread  has put together a wonderful list of 30 FREE printable Valentines.

Ashtyn is going to give these cute ones out at her baby Valentines party on Friday.


Sunday, February 7, 2010

WOODEN PLAY SALT AND PEPPER SHAKERS


So I'm definitely jumping on board with the wooden play toys trend. I figure the less plastic in everyones life the better. Although silly me I put a plastic button on this craft...oh well, I couldn't find what I was originally looking for so I had to compromise.

I'm in the process of making Ashtyn a little wooden kitchen (stay tuned for pics) so I've been wanting to make her some felt food and wooden accessories to go along with it. I originally saw this idea on another great blog called Homemade by Jill, and thought that I NEEDED to make Ashtyn a set of these.


I had the spools on hand and circle pieces but I didn't have the dome shaped pieces for the top of the shakers. Then I got an idea....I could use buttons....a white and black one. Then I took the negative of a letter sticker and stenciled the S and P on with non toxic paint. I love how they turned out. Oh and I can't forget the rice I put inside to make the shaker sound.

I think Ashtyn will like playing with these and salting her food just as much as her Grandpa likes to salt his....hee hee.

I was happy to find this cute wooden thing a majigger at Michaels yesterday to hold Ashtyn's S and P shakers!!

Tuesday, February 2, 2010

BEST WEBSITES TO HELP YOUR YOUR PRESCHOOLER LEARN - TIPS FOR TOTS

We all know that there is a lot if CRAP online when it comes to sites for our children. Now I don't think children need to be on the computer ALL the time however, I feel a small amount of exposure while visiting the right sites can be a great learning experience for children while getting to know basic computer skills. I  guess you can say it's Quality over Quantity when it comes to child computer use. The other day while visiting Quirky Momma I came across a list she had compiled of the BEST COMPUTER SITES TO HELP CHILDREN LEARN. I have recommended a few of these sites to my preschool parents in the past however, I was delighted to find that Rachel had many more great ones I hadn't heard of . I thought I would share this wonderful list with you. Now you can breathe a sigh of relief the next time your little pride and joy wants to spend time on the computer.

Monday, February 1, 2010

NO SEW Fleece Blanket Tutorial

This is my kind of project. I can sew but when a project I like is a no sew project I'm happy with that.

Supplies

2 pieces of polar fleece, I like to use two different patterns, one for the front and one for the back. For this blanket I used four yards all together (each side 2 yards) but you can use any size you want.

Scissors or one of those roller cutters

A tape measure or yard stick

A piece of paper

Directions

1. Start by trimming the salvage from your fleece


2. Next lay your two pieces of fabric on top of one another with the good sides facing out. If you look closely at the fleece one side will look more fuzzy than the other...that is the bad side. Those sides should be inside.


3. Make sure your two pieces of fleece line up, if not trim accordingly. Fleece is pretty forgiving and stretches easily when working with it so it doesn't have to be eactly perfect.

Here's my little buddy helping


4. Next cut a 5x5 square from a piece of paper. Use this piece to cut out all four corners from your fleece. This is how it will look when finished.


5. Once all four corners are cut take your yard stick or tape measure and line it up from corner to corner. This allows you to get the same length of tassle cuts. If your blanket is longer than the yard stick then just move your stick along as you go.


6. Start cutting your tassles. Make each cut about an inch apart. Make sure you cut through both pieces of fabric. Do this on all four sides of the blanket.


7. Once all sides are given tassles, start tying them off. I start by doing every other one. Once that is done flip the blanket over and tie off the rest. Some people choose to do double knots and that is fine too. Just keep it mind that your tassles will be a bit shorter.

8. That's it .....your done....now you have a nice cozy blanket. And the best part? You didn't even have to dust off the old sewing machine.


Here's another one I made for my daughters car seat blanket. It's not completely no sew since I sewed the little patch on.

Related Posts with Thumbnails