Monday, November 29, 2010

DiY BaTHRooM aRT

Hey everyone!!
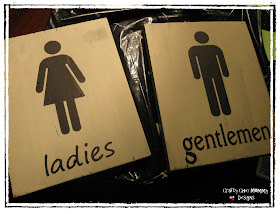
Today I whipped up some new art for my guest bathroom.
Like whatcha see...here's how I made them

Cut two pieces of wood to your desired size don't worry about sanding them since were going for the worn look anyways.

Paint your wood black
Once your black is dry, paint over top of it with a beige-ish colour. I mixed my white with some light brown paint
(sorry no pics of this)

Cut out your man and woman bathroom symbols and letters.
You can find the bathroom symbols on sure cuts a lot under "symbols."
Reverse weed your vinyl....so you have a stencil.

Once your paint is completely dry position your vinyl on your board and paint away. Peel your vinyl off.
Now the fun part, once all the paint is completely dry take a power sander (or hand sand) and make those signs look "old" looking.

{BEFORE}
{AFTER}
Add some picture hooks to the back of your signs and your good to go!!

Thursday, November 25, 2010

CrAFts aRe NeVeR A BoRe WiTH A 2X4

All I want for Christmas is a 2x4....really there is so much you can do with them in the crafting world.

For fall I made Wooden pumpkins, before that I made a set of Family Blocks and for my Christmas decorating I made this 2 x 4 snowman. 

{{{Here's my snowman tutorial}}}

1. Gather three pieces of 2 x 4 block in staggering sizes. Sand the edges.
3. Paint all three blocks. I used white paint mixed with a bit of light brown paint to tone down the bright white colour.
4. Once your white paint is dry take a bit of dark brown paint and water it down. I wanted the aged, primitive look so I painted all three blocks with my watered down brown paint and immediately wipped it off with a cloth.
5. For my snowman's nose I used a piece of beadboard painted orange. I painted my watered down brown paint over the nose and whipped it down allowing the brown to sneak into the grooves of the beadboard.
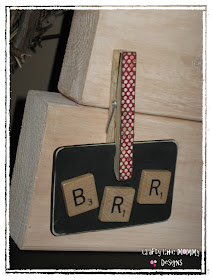
 6. Once my snowman was completely dry I glued him together using my Weldbond glue. I decorated him with little do dads I found in my craft cupboards such as twine, buttons and scrabble tiles.
A clothes pin, Mod Podged with scrapbook paper holds the little "Brr" sign.
I love how my snowman turned out...I'm making a few for Christmas gifts!!

Im linking my snowman to...


Childmade

Katie's Nesting Spot


Funky Junk Interiors

Photobucket
Join us Saturdays at tatertotsandjello.com for the weekend wrap up party!


Tuesday, November 23, 2010

LETS START THE CHRISTMAS SEASON WITH A NEW WREATH!!

I decided last year when taking down my Christmas decorations that this year my front door deserved a fresh new Christmas wreath with a bit more style and class. I won't even show you my old wreath...I'd hate to embarass myself.

I wanted my new wreath fairly simple so I chose only a few things to decorate it with.
A cream coloured star and two fall garlands. 

I picked the garlands up in the harvest section at Micheals a month ago but I'm sure they have something very similar in the Christmas section.

My wispy twig wreath was also purchased at Micheals.

I wrapped both garlands around the wreath in an over under motion. 

I then tied my star onto the wreath.
To make my star hang straight and not sideways I retied it using my piece of twine. Pull the loop of the twine through the hole on the star and feed the ends of the twine through that loop and pull. I hope that explanation wasn't too confusing!!

Lastly using floral wire, I added a hook to the back of my wreath so it could be hung securely.


Monday, November 22, 2010

ASHTYN'S ICE CREAM PARTY

This past weekend Ashtyn and a group of her family and friends gathered for an ice cream party to celebrate her 2nd birthday.

I had so much fun making and putting together all the party details. Best of all Ashtyn LOVED her party!!!

Good old Cricut makes banner making a cinch!!